Surface preparation ensures proper powder coating adhesion by removing oils, dirt, rust, and oxidation. The process typically includes degreasing, rinsing, etching, and phosphate coating, followed by drying. Each step improves coating durability and uniformity. Abrasive blasting or chemical pretreatment may be used for tougher contaminants or metals like aluminium and steel. Clean surfaces reduce coating failure risks, such as peeling or bubbling. Correct surface treatment directly influences finish quality, corrosion resistance, and coating longevity across industrial applications.
Table of Contents
- 1. Why Surface Preparation Is Critical in Powder Coating?
- 2. What Are the Key Goals of Surface Preparation?
- 3. What Are the Step-by-Step Surface Preparation Stages?
- 4. How should surface preparation vary based on material type?
- 5. What Are Common Surface Preparation Equipment Types for Powder Coating?
- 6. What Are the Standards and Best Practices for Surface Preparation?
- 7. What Are Common Mistakes in Surface Preparation?
Why Surface Preparation Is Critical in Powder Coating?
Surface preparation determines how effectively a powder coating bonds to a substrate. Without proper cleaning and treatment, coating failure risks, such as peeling, bubbling, or corrosion, increase significantly. Surface prep defines coating adhesion, aesthetics, and long-term performance.
How Surface Prep Affects Adhesion
Contaminants like oil, dust, and rust obstruct adhesion. Surface preparation removes these and increases surface roughness, allowing the powder coating to anchor securely. This roughness, often created using mechanical or chemical pretreatment, enhances surface energy, key to durable bonding.
Contaminant Type | Cleaning Technique | Result |
Oil & Grease | Alkaline Wash | Removes organic residues |
Rust & Oxides | Blasting/Etching | Exposes clean base metal |
General Dirt | Steam/Water Spray | Ensures particulate-free surface |
Preventing Common Coating Defects
Improper surface prep causes:
- Blistering due to trapped moisture.
- Flaking from poor adhesion.
- Uneven textures from debris or oxidation layers.
Both chemical pretreatment (e.g. phosphate coating) and mechanical methods (e.g. sandblasting) counter these issues by eliminating impurities and enhancing the metal’s receptivity.
Enhancing Corrosion Resistance and Lifespan
Conversion coatings applied during chemical pretreatment form a protective layer that resists corrosion. This added barrier significantly increases the powder coating’s lifespan, especially in high-humidity or outdoor environments.
Aesthetic & Functional Benefits
Uniform surface texture ensures a consistent coating finish. Clean, prepared surfaces minimise cosmetic defects like orange peel, ensuring a professional look.
What Are the Key Goals of Surface Preparation?
Surface preparation serves as the foundation for coating performance. Its primary goals include ensuring strong adhesion, increasing coating durability, and preventing coating failures like blistering, flaking, or corrosion.
1. Promote Strong Coating Adhesion
The process ensures the coating bonds securely with the substrate. By creating a clean, stable surface with the correct roughness profile, surface preparation enhances mechanical interlocking. This prevents delamination, especially under environmental stress.
2. Remove Contaminants That Impede Bonding
Contaminants such as rust, oil, grease, salts, or mill scale interfere with coating adhesion. Abrasive blasting, chemical cleaning, or solvent degreasing removes these layers, ensuring surface energy is suitable for coatings to spread and bind.
3. Create a Suitable Surface Profile
A defined surface texture improves coating grip. Shot blasting or sanding produces anchor patterns or micro-roughness. This improves mechanical adhesion and reduces the risk of coating lift.
4. Prevent Corrosion Through Substrate Stabilisation
Removing oxidised layers and applying pre-treatment layers reduces moisture retention and ion migration. This significantly lowers the risk of corrosion initiation beneath the coating layer.
5. Repair Surface Defects
Surface irregularities such as cracks, pits, and voids are repaired to maintain coating uniformity. This ensures a smoother application and consistent thickness.
6. Ensure Uniformity and Visual Consistency
Uniform surface roughness supports even coating application. This prevents patchiness and helps maintain consistent gloss or sheen.
What Are the Step-by-Step Surface Preparation Stages?
Surface preparation follows a linear five-step process designed to optimise coating adhesion, surface integrity, and durability. Each stage targets specific contaminants or defects to ensure the surface is ready for painting, bonding, or welding.
1. Remove Existing Coatings and Surface Contaminants
Remove paint, grease, oils, rust, and chemical residues using:
- Abrasive blasting (e.g. sandblasting, grit blasting)
- Solvent or alkaline chemical cleaning
- High-pressure washing
These methods eliminate contaminants that interfere with adhesion or weld fusion.
2. Increase Surface Roughness
Create a surface profile using:
- Sanding or grinding
- Chemical etching (e.g. phosphoric acid)
- Laser texturing
This increases surface energy, improving bonding strength for coatings and adhesives. High roughness boosts mechanical anchoring.
3. Modify the Surface Chemistry
Enhance surface reactivity through:
- Oxidation via laser or chemical treatments
- Application of conversion coatings (e.g. chromates for metals)
Higher surface free energy enhances wetting and promotes molecular bonding.
4. Remove Dust and Residual Particles
Eliminate abrasive residues with:
- Air jets or vacuum systems
- Tack cloths or solvent wipes
Residual particles reduce bond integrity and cause surface defects.
5. Rinse Off Chemical Residues and Ensure Surface Dryness
After chemical prep, rinse with clean water. Then:
- Use heat or air drying systems
- Measure humidity to prevent flash rust or blistering
Surfaces must be dry to avoid coating failures like pinholing or delamination.

Step-by-Step Surface Preparation Stages
How should surface preparation vary based on material type?
Surface preparation techniques must match the physical and chemical properties of the substrate to ensure coating adhesion, corrosion resistance, and surface cleanliness. Below are optimal methods per material type:
Steel
Steel requires aggressive preparation due to oxidation. Use:
- Abrasive blasting (e.g., grit or shot blasting) to remove mill scale and rust, and create a high-adhesion surface profile.
- Acid pickling with hydrochloric or sulfuric acid to remove embedded oxides.
- Flame cleaning for removing heavy organic residues.
Steel benefits from a surface roughness between 50–100 µm for high-performance coatings.
Aluminium
Aluminium is softer and prone to oxidation:
- Solvent cleaning removes grease and rolling oils.
- Alkaline or acid etching (e.g., sodium hydroxide or phosphoric acid) removes oxide layers and etches the surface.
- Anodising creates a protective oxide film, increasing paint adhesion and corrosion resistance.
Avoid abrasive blasting unless low-pressure and fine media are used.
Galvanised Steel
Zinc coatings react with many chemicals:
- Solvent cleaning and non-etching alkaline degreasers remove contaminants without damaging zinc.
- Light abrasive sweep blasting (with low pressure) roughens the surface for better coating grip.
- Phosphating improves adhesion and corrosion resistance.
Avoid strong acids that can dissolve zinc.
Cast Iron
Porous and brittle, cast iron needs:
- Abrasive blasting to remove scale and open surface pores.
- Solvent or alkaline cleaning to remove embedded oils.
- Drying immediately post-cleaning to prevent flash rust.
Moisture control is critical due to high porosity.
Heat-Sensitive Substrates (e.g., plastics, composites)
Use non-thermal and low-impact techniques:
- Solvent wiping for degreasing.
- Plasma treatment or corona discharge for surface activation.
- Fine sanding or micro-abrasion for mechanical adhesion.
Avoid flame or heat-based methods to prevent warping or degradation
What Are Common Surface Preparation Equipment Types for Powder Coating?
Surface preparation equipment removes contaminants and modifies substrate texture to improve powder coating adhesion. Each system targets specific contaminants, such as rust, grease, oils, or residues, ensuring clean, bond-ready surfaces.
1. Sandblasting Equipment
Sandblasters use abrasive media like aluminium oxide, steel grit, or garnet. Abrasives impact the surface at high velocity, removing corrosion and creating anchor profiles critical for mechanical adhesion.
2. Blast Cabinets
Blast cabinets enclose the abrasive blasting process. They offer controlled media recycling, reduce dust emissions, and are ideal for small to medium-sized components in enclosed production settings.
3. Degreasing Machines
Degreasing units eliminate oils, waxes, and machining lubricants. Most use solvent-based, aqueous, or alkaline chemistries. Efficient degreasing prevents adhesion failure and blistering in powder layers.
4. Pressure Washers
High-pressure washers clean off loose dirt, old paint, or surface dust. They’re used as pre-cleaning tools before deeper treatments like chemical dips or blasting.
5. Ultrasonic Cleaners
These systems use cavitation in a liquid bath to remove microscopic contaminants. They’re essential for intricate or sensitive parts where abrasive or high-pressure methods are unsuitable.
6. Chemical Dip Tanks
Dip tanks immerse parts in solutions like phosphates, chromates, or degreasers. The process removes oxides and prepares the metal chemically, improving corrosion resistance and coating integrity.
7. Cleaning & Pretreatment Systems
Multi-stage washers combine degreasing, rinsing, and conversion coating. They automate cleaning steps and standardise chemical application across batches.
8. Conveyors for Material Handling
Conveyors automate part movement through each stage. Consistent timing helps maintain processing uniformity and minimises manual handling errors.
9. Powder Spray Machines
Electrostatic spray guns apply powder uniformly. Charged powder clings to grounded parts, enabling consistent film builds.
10. Curing Ovens
Ovens heat parts to fuse powder particles. Standard curing ranges between 160–210°C, depending on resin type, ensuring long-lasting finishes.
What Are the Standards and Best Practices for Surface Preparation?
Surface preparation standards define the required levels of cleanliness, texture, and contaminant removal. They directly impact coating adhesion, durability, and corrosion resistance. Globally recognised standards include ISO 8501, ASTM D610/D714, and NACE/SSPC specifications.
ISO 8501: Defining Cleanliness Grades
ISO 8501 uses pictorial guides and textual descriptions to classify rust removal levels:
- Sa 1: Light blast cleaning
- Sa 2: Thorough blast cleaning
- Sa 2½: Very thorough blast cleaning
- Sa 3: Blast cleaning to visually clean steel
It provides reference photos to standardise expectations across inspectors and applicators.
ASTM D610/D714: Evaluating Coating Performance
ASTM D610 measures corrosion resistance via rust grade assessment, while ASTM D714 rates coating blistering:
- D610 evaluates rusted areas in percentage increments.
- D714 scores blister size and frequency.
These standards verify performance post-application, ensuring surface preparation was effective.
NACE/SSPC Standards: Cleaning Methods and Levels
SSPC standards like SP-1 (Solvent Cleaning), SP-3 (Power Tool Cleaning), and SP-5 (White Metal Blast Cleaning) define:
- Cleaning method
- Surface condition post-cleaning
- Acceptable residual contaminants
SSPC/NACE joint standards also quantify surface profiles and allow certain tolerances. For example, SP-6 allows minor staining over 33% of a unit area, while SP-10 restricts it to 5%.
Best Practices Include:
- Solvent removal of oils and greases (SP-1)
- Mechanical methods for rust and mill scale removal (SP-2 to SP-16)
- Visual and tactile verification of surface profile (≥1 mil for SP-11)
Testing coating adhesion before full application
What Are Common Mistakes in Surface Preparation?
Mistakes in surface preparation cause coating failures, adhesion loss, rust under the film, and costly rework. These issues often arise from improper cleaning, rushed workflows, poor environmental control, or using unsuitable prep methods for the substrate.
1. Insufficient Degreasing
Traces of grease, oil, or silicone block coatings from bonding. Even invisible residues can cause peeling or bubbling. Use dedicated degreasers appropriate for metal, plastic, or composite surfaces.
- Residue Left Before Coating
Adhesive residue or dried cleaning agents can interfere with bonding. Always remove all residues using solvent wipes or mineral spirits.
- Flash Rust Between Prep and Coating
Freshly cleaned metal oxidises rapidly in humid air. Flash rust undermines coatings. Apply primer or rust inhibitors immediately after preparation.
4. Using the Wrong Prep Method for Material
Materials like aluminium, galvanised steel, or composites require tailored prep steps. Incorrect methods lead to poor adhesion or damage.
- Rushing Between Steps
Skipping required wait times between cleaning, neutralising, and rinsing leads to ineffective surface activation. Follow product-specific dwell recommendations for effective treatment.
- Incomplete Rust Removal
Rust in seams or crevices spreads under coatings. Use mechanical abrasion (e.g. flap discs) or rust converters to treat all corrosion points.
7. Improper Neutralisation and Rinsing
Leftover chemicals alter pH balance, reducing coating performance. Neutralise with compatible agents and rinse with clean water to eliminate residue.
8. Contaminated Tools and Handling
Oil or silicone residues from reused tools compromise clean surfaces. Use clean, lint-free cloths, and wear gloves to prevent fingerprints.
9. Environmental Mistakes
Coatings and prep agents work best at 15–25°C and <60% humidity. High humidity causes flash rust; low temperatures reduce chemical reactivity.
10. Delays Between Prep and Coating
Prepared surfaces collect dust or oxidise quickly. Apply coatings promptly, ideally within 2 hours, to prevent flash rust or airborne contamination
Summary Table of Common Errors
Error | Entity | Impact | Mitigation |
Insufficient Degreasing | Oils/Grease | Adhesion failure | Use industrial degreasers |
Residue Left Before Coating | Masking/cleaning agents | Coating lift or peeling | Remove all residues with solvent wipes |
Flash Rust Between Prep Steps | Moisture | Early corrosion | Use inhibitors, apply coating promptly |
Wrong Prep for Material | Aluminium, galvanised steel | Coating incompatibility | Follow substrate-specific prep protocols |
Rushing Between Steps | Chemical dwell times | Poor reaction | Wait required times |
Incomplete Rust Removal | Rust in crevices | Underfilm corrosion | Use mechanical or chemical rust removal |
Improper Neutralisation | Acid/alkaline residues | Blistering, delamination | Neutralise and rinse thoroughly |
Contaminated Tools | Brushes, cloths with oils | Localised failure | Use clean, residue-free tools |
Poor Environmental Control | High humidity, low temp | Flash rust, poor adhesion | Maintain ideal temperature and humidity |
Excessive Delays After Prep | Dust, airborne moisture | Recontamination | Coat surfaces within 2 hours of prep |
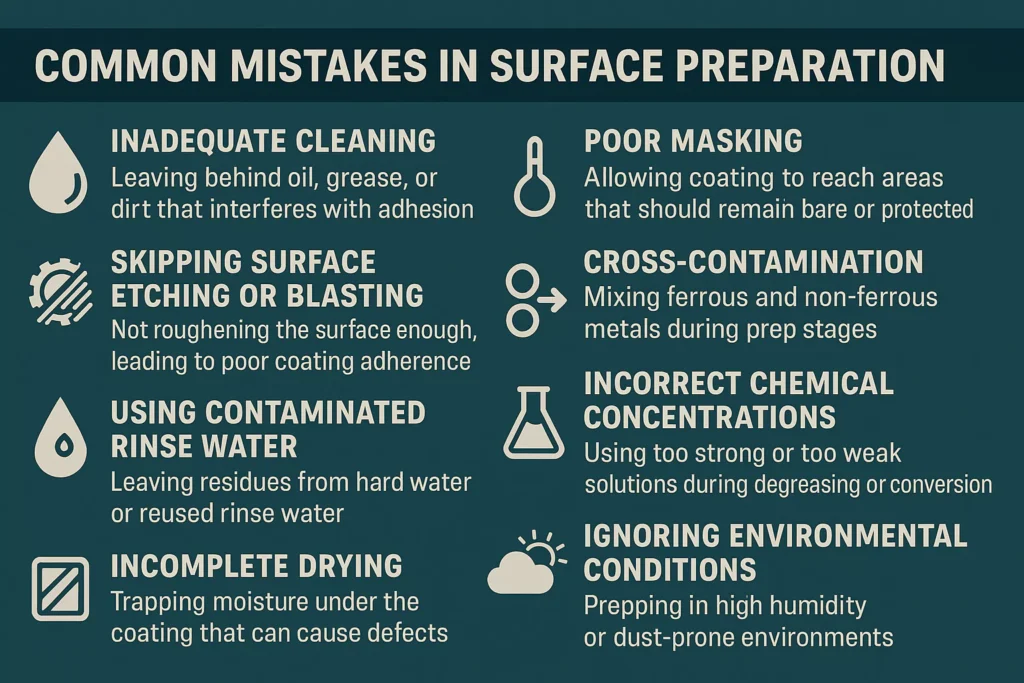
Mistakes to Avoid When Preparing Surfaces